
Instead of manually reinstalling your app and tapping through permission prompts before every release, build separate Maestro YAML flows for permission acceptance, permission denial, and returning-user onboarding. Use Maestro Deck’s free local desktop runner to inspect each state, execute the flows, and check the outcome before adding optional cloud execution.
- Maestro Deck suits developers starting mobile app automation testing with local YAML flows and an inspector.
- Test onboarding completion, permission denial, and returning-user behavior as separate end-to-end paths.
- Reset app data and operating-system permissions deliberately; they are different test prerequisites.
- Add cloud execution when your release workflow needs CI runs, not as a requirement for local testing.
Why this matters
Permission tests fail when the setup and the assertion describe different states. An app can remember completed onboarding while the operating system still denies a permission. A returning user can also revoke access outside the app.
Test the resulting behavior, not just the tap on a permission dialog. Accepting a request should lead to the intended feature. Denying it should lead to the fallback your product specifies, rather than a blocked onboarding screen.
Maestro Deck is best for developers and QA engineers who want a free local runner and inspector for Maestro YAML end-to-end tests. Maestro Deck is the desktop tool described here; Maestro is the framework whose YAML flows it executes. Treat them as distinct projects, without assuming affiliation.
For your 2026 release baseline, define the states first. A passing test should explain what the user can do after onboarding, not merely confirm that the final onboarding screen disappeared.
Before you start
- Prepare the build and environment. Install the app build under test on your chosen simulator, emulator, or physical device. Confirm that your local runner and framework support that environment. Keep the build identifier, operating-system version, and test account with the run record.
- Define observable outcomes. Identify the onboarding completion signal, the permission-dependent feature, and the denied-access fallback. Use test accounts and non-sensitive fixtures. Your local desktop workflow does not require paid cloud execution.
- Separate app state from permission state. Clearing app data does not establish a known permission state across every platform and setup. Explicitly prepare and verify both before the flow begins.
That last prerequisite prevents a common false pass: a flow reaches the home screen because onboarding was already complete, without testing a first-run experience. Use the guide to resetting app state between test runs when defining your reset procedure.
Permission and onboarding test matrix
Start with 3 baseline flows: permission accepted, permission denied, and returning user. These are different contracts. Combining them into one long flow makes failures harder to attribute and makes the starting state depend on earlier actions.
| Flow | Best for | Starting state | Required outcome | Strength | Limitation |
|---|---|---|---|---|---|
| Permission accepted | Checking the enabled feature | Incomplete onboarding; permission not yet decided | Onboarding completes and the feature works | Covers the intended enabled path | Does not prove denial handling |
| Permission denied | Checking fallback behavior | Incomplete onboarding; permission not yet decided | The specified fallback appears and onboarding follows the product contract | Exposes blocked or misleading screens | Needs its own permission setup |
| Returning user | Checking persistence | Completed onboarding; explicitly chosen permission state | The expected destination opens without inappropriate onboarding | Checks saved progress | Does not replace first-run coverage |
Do not require every permission before the user can finish onboarding unless that is the intended product behavior. Your test should encode the product contract, including any feature that genuinely cannot work without access.
Keep this matrix beside the flows. During a 2026 release review, a reviewer should be able to identify the starting state and expected result without reading every YAML command.
Starting-state configuration
- Choose one permission. Start with a permission tied to an observable feature, such as camera access for image capture. Record why the app requests it and what should happen after denial. Expand coverage only after this path is repeatable.
- Set the account and app state. Prepare an account with the required onboarding status. Establish whether the app starts signed out, signed in, or before account creation. Do not let a previously used account silently skip required screens.
- Set the operating-system permission state. Prepare the state needed by this case: undecided, granted, or denied. Use the procedure supported by your platform and test environment. Verify the state rather than assuming a reinstall produced it.
- Record the environment. Associate the flow with its app build and operating-system version. Keep platform-specific prerequisites explicit rather than hiding them inside shared onboarding steps.
Expected result: before executing any onboarding action, you can identify the account state, onboarding state, and permission state independently.
Use the same starting-state procedure in local development and automated execution. A shared flow cannot compensate for different prerequisites. If a failure disappears only after a manual reset, the reset belongs in the documented setup.
Inspector and selector configuration
- Open the target screen and use Inspector Mode to inspect the elements involved in onboarding. Identify the primary action, progress indicator, permission explanation, fallback, and destination screen.
- Prefer identifiers that express an element’s purpose when your app exposes them. Ask the app team to add stable identifiers where the existing structure makes selection ambiguous.
- Distinguish app-owned screens from operating-system dialogs. The app’s permission explanation is not the permission decision itself. Inspect each surface in the environment where the test will run.
- Map each action to a visible assertion. After advancing onboarding, check the next meaningful state. After making the permission decision, check the resulting app behavior.
Expected result: each action targets an identified element, and each transition has an observable success condition.
Do not copy a selector from one platform into another without checking it. System dialogs, accessibility information, and app layouts require platform-aware handling. Keep shared business expectations while allowing platform-specific interaction steps.
When writing the YAML, use the documented command syntax for your installed Maestro version. Keep runner configuration separate from application assertions. A flow should describe the user journey; credentials and environment selection belong in the execution setup.
YAML flow configuration
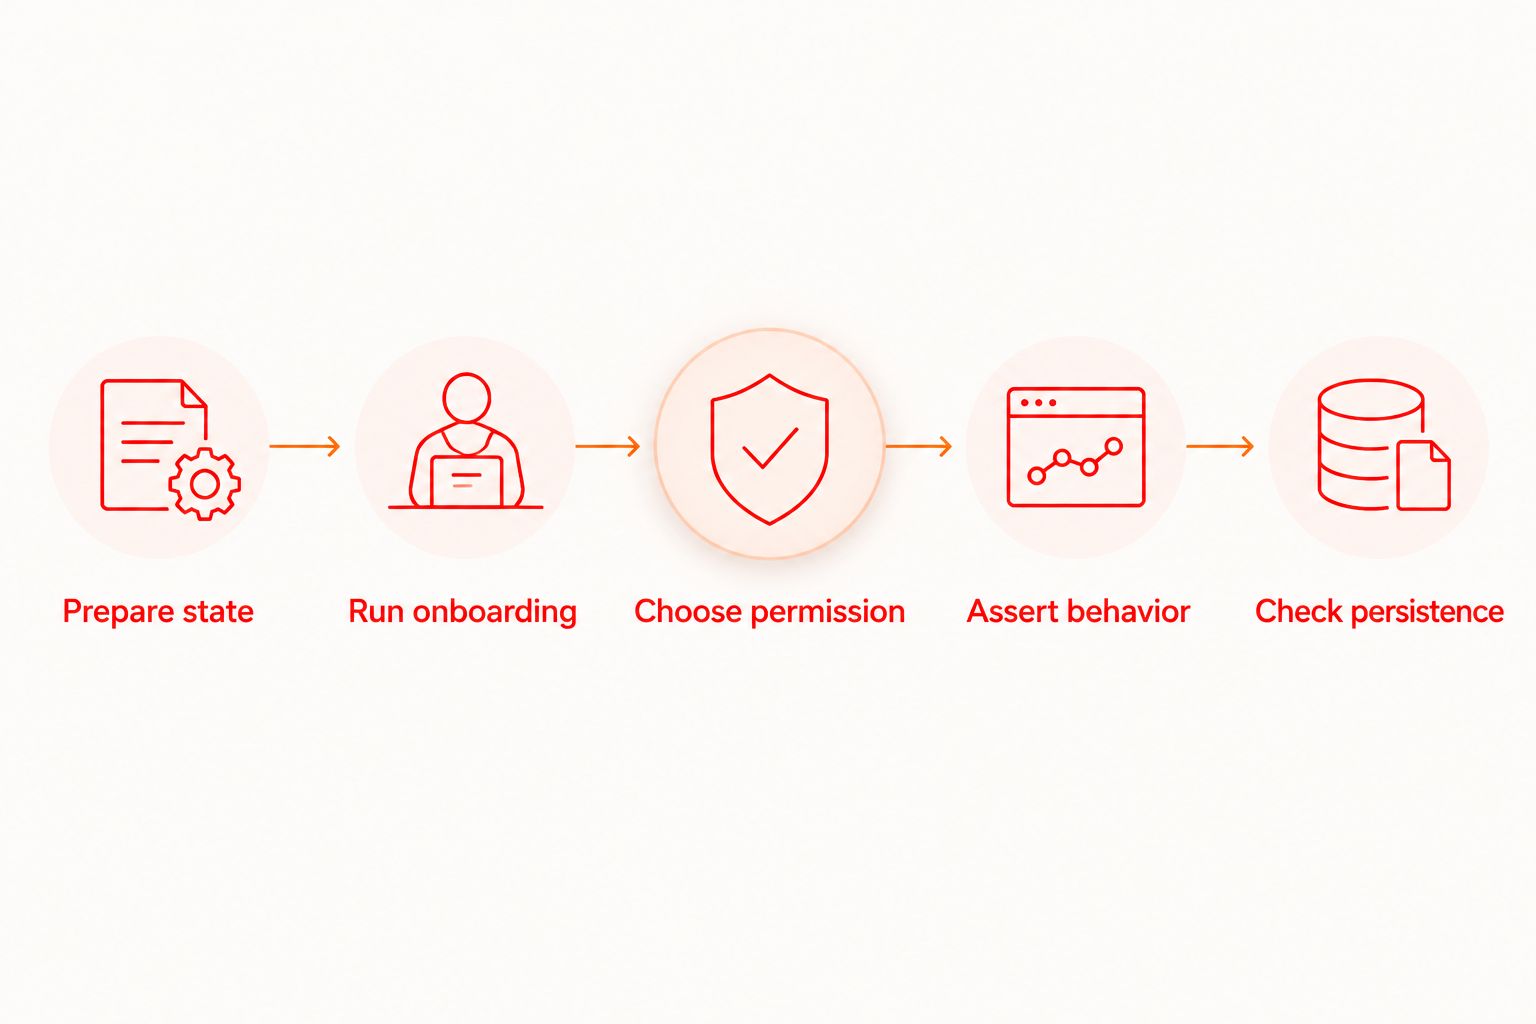
- Prepare state. Begin the case using the account, onboarding, and permission prerequisites already defined. Keep the reset procedure explicit so another developer can reproduce the run.
- Run onboarding. Advance through the required screens. Assert meaningful transitions rather than checking every decorative element. Stop at the permission request relevant to this case.
- Choose the permission outcome. Handle the intended operating-system decision. Keep acceptance and denial in separate entry flows so a failure identifies the branch being tested.
- Assert behavior. For acceptance, verify the permission-dependent feature reaches its intended usable state. For denial, verify the explanation, alternative action, or restricted feature state required by the product.
- Check persistence. Relaunch through your documented procedure and verify the expected onboarding destination. Treat process restart and app-data reset as different operations.
Expected result: each YAML flow proves a specific onboarding outcome from a known starting state, including what happens after the permission decision.
The sequence is simple. The discipline is keeping preparation, user actions, and assertions distinguishable. A flow that only taps forward can finish successfully while the product still leaves the user in the wrong state.
Keep shared onboarding actions reusable, but do not hide the branch-specific assertions inside a generic completion helper. The denial flow should make its fallback expectation obvious to someone reviewing a failed run.
Local execution and release configuration
- Run the accepted-permission flow locally. Inspect any failure at the first incorrect state rather than continuing to adjust later selectors.
- Run the denied-permission flow from its own prepared state. Confirm that the app follows the specified fallback and does not accidentally inherit the earlier grant.
- Run the returning-user flow. Check that completed onboarding stays completed and that the destination reflects the selected permission state.
- Require 2 consecutive runs from freshly prepared prerequisites before treating a case as repeatable. This is a practical acceptance check, not a performance benchmark.
- Record what failed: preparation, element selection, permission interaction, or product behavior. Preserve the relevant run output and environment details.
Expected result: each case passes independently and produces a failure that a developer can investigate.
Maestro Deck’s free local runner keeps flow development separate from paid cloud execution. The trade-off is operational: your team still prepares the local environment and runs the checks. Optional cloud execution belongs later, when you need execution from CI or broader scheduled coverage.
For your 2026 release workflow, move repeatable cases into automation before expanding the matrix. More cases do not fix an unreliable starting state.
Test permission changes after onboarding
A first-run permission decision is not the only relevant workflow. Add a returning-user variant that changes permission after onboarding has finished.
Prepare a completed account, establish granted access, and verify the relevant feature. Then change the permission through the supported platform procedure and return to the app. Check what happens when the user opens the feature again.
Best for: features that users revisit after changing permissions outside the app. This variant checks stale assumptions that a first-run flow cannot expose.
The benefit is coverage of a different lifecycle transition. The cost is extra environment handling, especially when platform settings sit outside the application under test. Keep that preparation separate from reusable in-app navigation.
In your 2026 test matrix, distinguish revocation from first-time denial. Both remove access, but they begin from different application histories and deserve separate expectations.
Troubleshooting
The permission dialog never appears
The environment already has a permission decision, or the app never reaches the request. Verify the operating-system permission state and the app screen immediately before the request. Do not add repeated taps to compensate for an unprepared environment.
Onboarding disappears before the test reaches it
The account or app storage already records completion. Prepare a genuinely incomplete onboarding state and verify it before executing the flow. Resetting local storage alone does not reset server-side account progress.
The flow taps the wrong control
The selector matches multiple elements or depends on text that changed. Inspect the failing screen and target a stable identifier where available. Treat operating-system controls separately from app-owned controls.
The test passes after denial but the feature is unusable
The assertion checks navigation rather than the promised fallback. Assert the denied-access explanation or alternative action specified by the product. Reaching a destination screen is insufficient when that screen offers no valid next step.
The same flow behaves differently across environments
Compare app build, operating-system version, account state, permissions, and device type. Reproduce those prerequisites locally before changing the YAML. Simulator or emulator success does not establish physical-device coverage.
Customize your workflow
Expand by user risk, not by screen count. Add another permission when it protects a distinct feature contract. Add another platform when its permission handling needs independent coverage. Keep the smallest useful release suite easy to run.
For a 2026 execution plan, make the boundary explicit: local flow development first, optional cloud runs when CI or execution scope requires them. Check environment support and test-data handling before sending accounts or fixtures to a hosted service.
Maestro Deck is source-available, not described here as open source. Those licensing terms are not interchangeable; review the applicable license before making redistribution or modification decisions.
FAQ
How do I start mobile app automation testing for onboarding?
Start with separate flows for permission acceptance, permission denial, and returning-user behavior. Prepare app state and operating-system permission state before each flow, then assert the resulting feature behavior.
Can I run Maestro Deck locally without paid cloud execution?
Yes. Maestro Deck provides a free local desktop runner and inspector for Maestro YAML flows. Paid cloud execution is optional when your workflow needs it.
Is Maestro Deck the same thing as the Maestro framework?
No. Maestro Deck is a desktop runner and inspector for writing and executing Maestro YAML flows; Maestro is the framework whose flows it executes. Treat the tools as distinct projects.
Should I reset permissions before every onboarding test?
Prepare the permission state required by each test before it runs. A first-request test needs an undecided state, while a returning-user test can deliberately start with granted or denied access.
What should an automated test check after permission denial?
Check the product’s specified fallback and whether onboarding follows its intended completion rules. Do not treat a successful tap on the denial control as proof that the app handles denial correctly.
Do simulator tests prove that permissions work on physical devices?
No. Simulator and emulator runs establish behavior in those environments, not physical-device coverage. Include supported physical-device testing when your release requirements call for it.
When should onboarding flows move into CI?
Move onboarding flows into CI after they pass independently from documented starting states and produce actionable failures. Keep credentials, fixtures, and environment preparation consistent with the local workflow.
One last thing
Assert the absence of the wrong state, too. A returning-user flow should check its intended destination, but it should also detect onboarding that reappears incorrectly. A denied-permission flow should detect a misleading enabled state, not merely find the fallback text.
That makes the test contract harder to satisfy accidentally. Keep both expectations tied to observable product behavior rather than layout details.